Six Drawer Dark Olive Green - Bassett
- Rachael Engell
- Mar 25, 2022
- 2 min read

Hello! Yes - another green! Highly requested - a hands down favorite of mine and it seems many others as well. Even though many of these pieces are all painted the same color, I love that they are all still so different! Each one unique...taking on a personality of their own based on how they came to me and the decisions made to get them simplified, modernized and ready to be appreciated in their new homes!
Ok - let's talk about this piece:

Here is the before pic taken from the previous owner. Highlights: solid wood construction, dovetail drawers that slide nicely, made by Bassett, good storage, good shape, pretty good condition. Items to address: outdated bottom/legs, damage on bottoms, outdated details, hardware and finish.
STEP 1: REMOVE AND REPAIR
First off, I removed the bottom using my drill and screw driver. Thankfully not a skill saw job this time! I then repaired any damage and filled the decorative holes with wood filler.
STEP 2: SAND

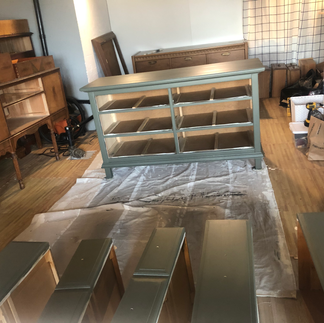
I used my Dewalt orbital sander, Dremmel Multi Tool and good old fashioned hand sanding for this job. Side note: apologies for the dark pics! A lot of times I work in the early morning hours so I can do my Mom job/homeschool during the day. Balance...or attempting to ;-).
STEP 3: PRIME AND PAINT
Two coats of good primer and 2 coats of paint + touch ups. The color is my favorite green: Dark Olive by Benjamin Moore. So pretty every time! And pretty in all light too. In low light, it's a darker cooler green and in sunlight it's a warmer olive. All very neutral too. Lovely!
STEP 4: CLEANING AND HARDWARE
This piece came to me with contact paper lining the drawers. I chose to keep them on during the makeover process as a form of protection for the drawers. Now...time to remove it all. Tool of choice: hairdryer. Came off so easily! Next, I washed all the drawers and inside the body of the dresser with a citrus degreaser. Some beeswax candle wax on the drawer slide (they are wood and this helps them to slide even better...also makes them smell so nice!) and this piece is all spiffed up and ready for new hardware. I chose a simple, squared off design. I just love the T knobs and was thrilled to use them here.
STEP 5: STAGE AND SELL
Ok - I'm feeling the itch to make some new art so look for that in the next finished pieces to come! It's just been a matter of getting the time (of course). This still turned out lovely, though...using art I've previously made, plants and candles from my home + I grabbed a pretty lamp from our guest room. Now, this piece is finished and ready to be enjoyed in a new home! Thinking of that always makes me so happy :-).
I hope you enjoyed this post! Please let me know if you have any questions/requests/comments by sending me a message through my site or at rachael@rachaelannart.com
P.S. instagram coming soon...I think...lol...


Comentários